A best friend. A trusty steed. Your favorite vehicle.
It has served you well for years and provided nearly maintenance-free service. Many memories – good and bad – have happened in and around that vehicle. It’s always been 100% ready even when you haven’t been.
It’s the human connections like these that turn a machine into something more for its owner.
We’ve all probably arrived at this crossroad at some point in our lives. That adored vehicle isn’t what it used to be. All of those worry-free years have caught up to us. In their wake are oil puddles, mysterious vibrations, wonky steering, and general disrepair. What does one do when faced with this dilemma? The options are simple yet the choices are hard:
- Sell it in an attempt to reap a return. Buy a different car that you have no history with. Or…
- Go out of your way to fix your long-time mechanical companion.
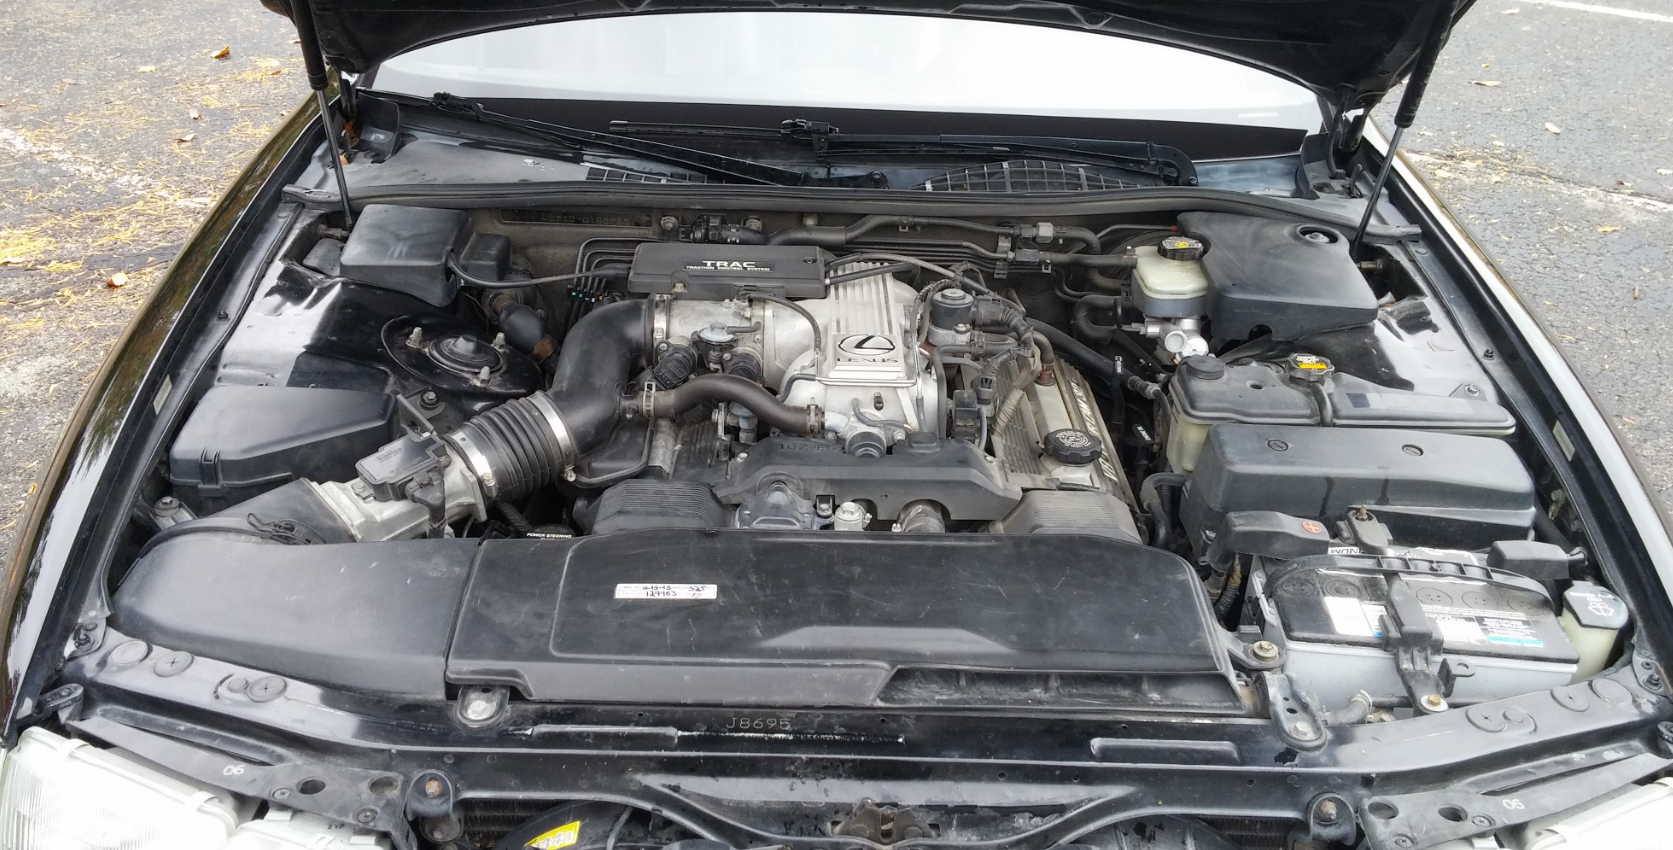
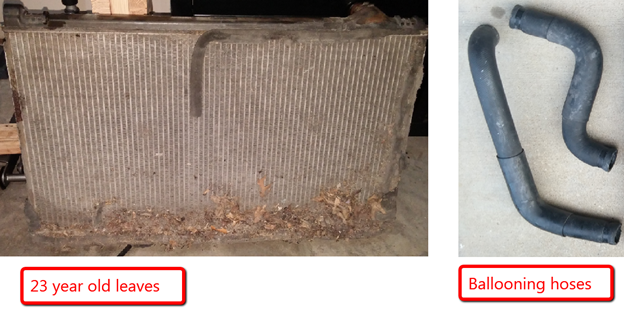
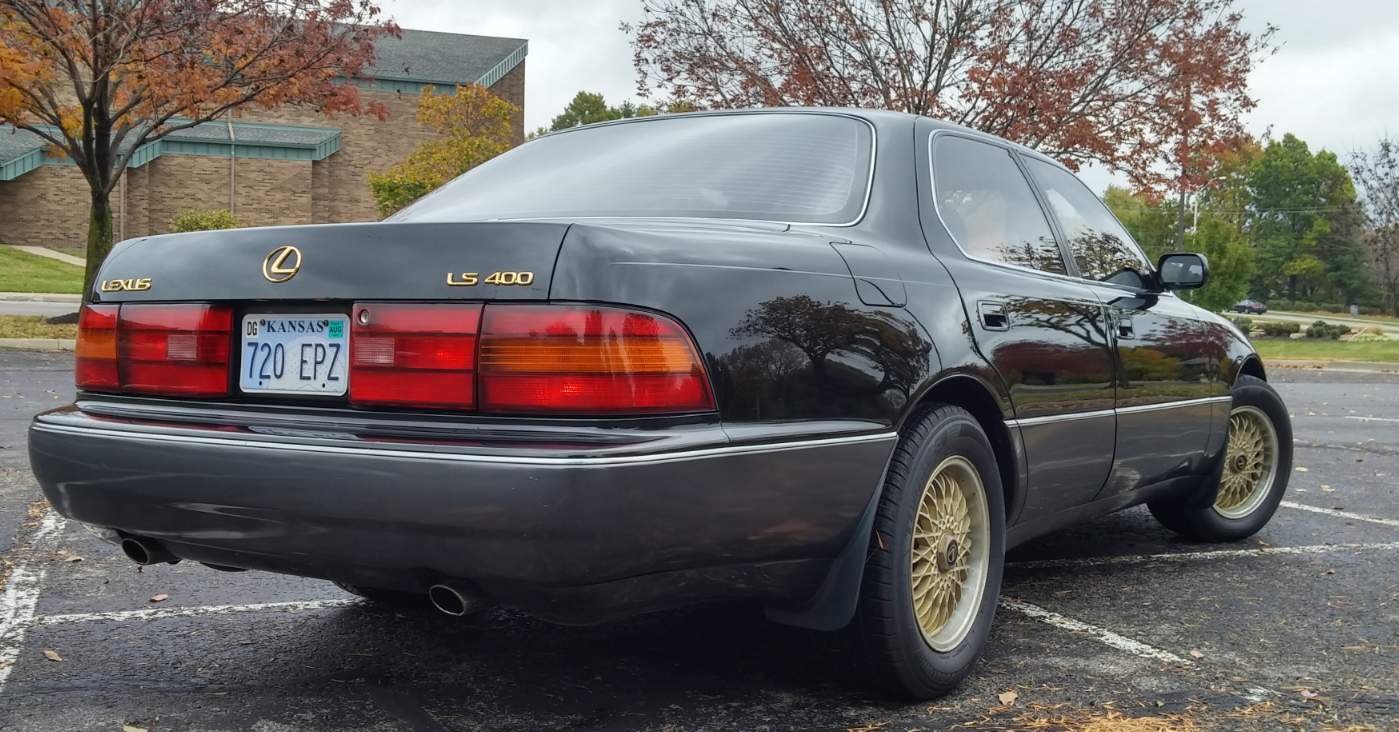
I recently faced this difficult decision. My trustworthy 1993 Lexus LS400 had been a stellar car since the day I bought it. I’d never driven a car that was so smooth and quiet. Oil changes were about the only thing it required. Then, after a couple of years, the defects started to pile up. Oil spots began appearing on the driveway and the aroma of burning oil lingered in the air. The steering wheel shook like mad above 60 MPH. The brakes pulsated and the power steering pump whined. The whole car had an annoying vibration when at a stop. Needless to say, the 23 years of carefree driving began to catch up to the LS400. I had a general understanding of how cars worked and I knew that these symptoms were an indication that multiple systems within the car needed attention.
And Now, Deep Thoughts
I spent a few weeks seriously considering a new car. The thought of a factory warrantied automobile that would drive like new because, well, it was new, seemed like a solid proposition. Imagine 10 years of uninterrupted reliability! Ultimately, that thought process passed. $20,000 is a lot of money no matter how you slice it, and even that doesn’t buy you a whole lot of new car. As someone of modest means, taking on the financial burden of a new car was a gulp too large to swallow.
I then considered getting another used car. Having owned a Lexus LS400, I found myself wanting the same qualities of that car in my next car. Let me tell you straight that there is no direct replacement for an LS400. Reliability, build quality, affordability, comfort, quietness, smoothness, and general presence. There simply isn’t anything with all of these qualities aside from another Lexus LS. A used car also may prove to be just as in need of repairs as my current car. Cars come up for sale for many reasons, but with older cars, it is often because the seller has identified a problem they are not willing to have fixed. As the phrase goes, “The car you know best is the car you already have.”
I then looked into fixing the trusty LS400 in my driveway. I knew that taking it to a reputable shop would be an extremely pricey proposition. Also, shops typically don’t like you to bring in a list of 30 things that need fixed. Tying up one of their services bays for long periods of time is only feasible if there is a sizeable profit waiting on the other end. They have a business to run, who can blame them?
I researched how to do some of the procedures I would need to do and determined that, with some luck, I could take them on in my garage. I then made out a spreadsheet detailing the estimated cost of all parts and materials I would need. Not cheap, but still much cheaper than a few months with a new car payment.
Finally, I came to a decision. I can’t say that my particular decision was wise. In fact many will disagree with it based mainly on their perceived value of time. I feel that I am a true Jalop, and any length of time under the hood is better spent than time vegging out to Netflix. With great hesitation, I pulled out my debit card and began buying a large number of parts. So many parts that I had a fraudulent activity hold put against my card three separate times. After convincing my bank that, Yes, I have made twenty-three separate transactions on eBay within the last hour, the parts were on their way. It took about a week and a half to get everything, which was OK, because that allowed me some time to plan.
I divided this project into two separate operations:
- Peripherals: Suspension and chassis related jobs
- Engine: Essentially everything under the hood
Fixing The Peripherals
I started with the peripheral repairs because I figured these would require the most physical effort as I had to get under the car to do all of them. If I couldn’t manage to replace these particular parts then there was no point in proceeding to the complex and delicate engine repairs.
1. Replace the engine mounts
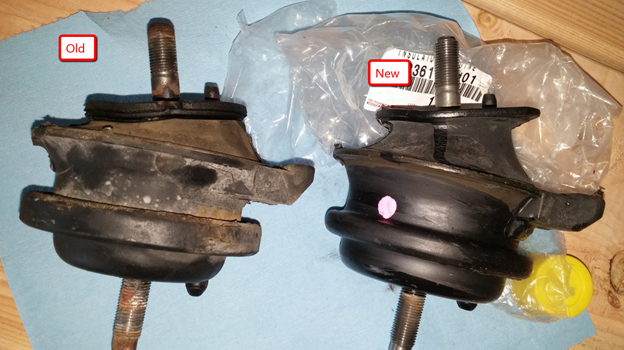
New engine mounts would potentially cure the rough vibrations I had sensed when the car was started and when it was idling at a stop.
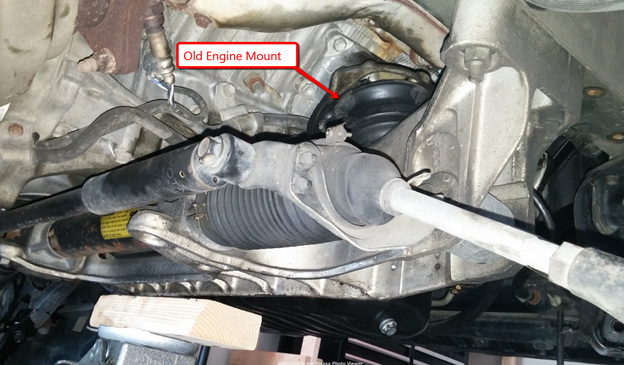
Here’s a comparison between the old and new engine mounts. You can see how much the old ones had been compressed over time. Also, you can see how the new mount designs have evolved ever so slightly.
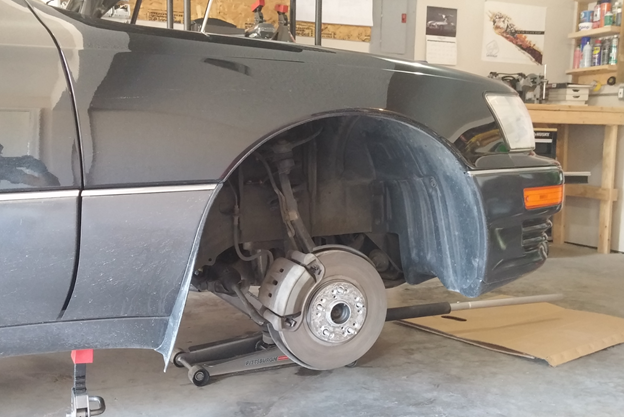
To replace the engine mounts, the whole front subframe must be lowered and the engine must be supported separately with a jack. It was a balancing act, but doable with only one person.
2. Replace the steering rack bushings
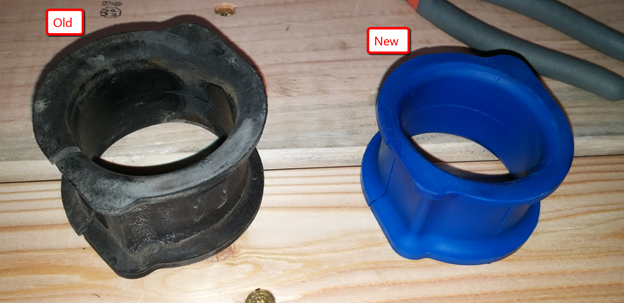
New bushings would hopefully cure some of the sloppy steering I was experiencing. I installed new stiffer polyurethane bushings to replace the old and deteriorated rubber mounts.
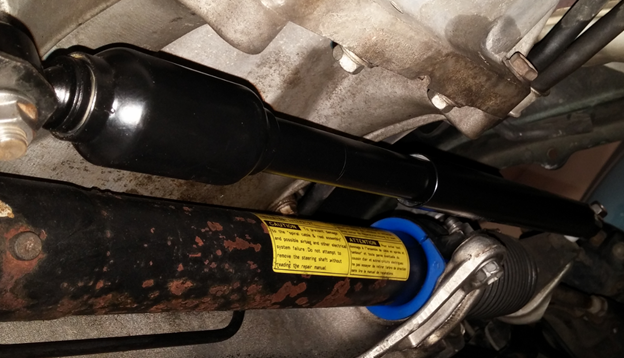
3. Replace the steering damper
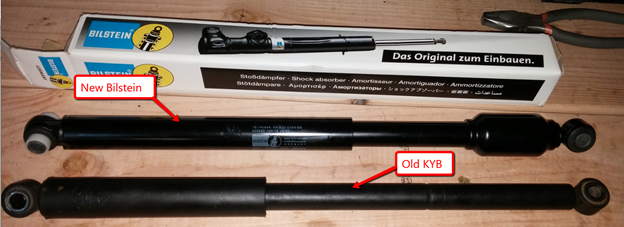
The original steering damper was shot. From the outside it looked fine and it wasn’t leaking. However, when I removed it I could tell it had an inch of free play in the center of its travel. This no doubt led to harsh steering wheel vibrations at highway speeds.
I decided to fit a much more robust Bilstein damper from a Mercedes S-Class. Not only was it the same dimensions and significantly cheaper than OEM, it was also much better constructed than the original KYB unit.
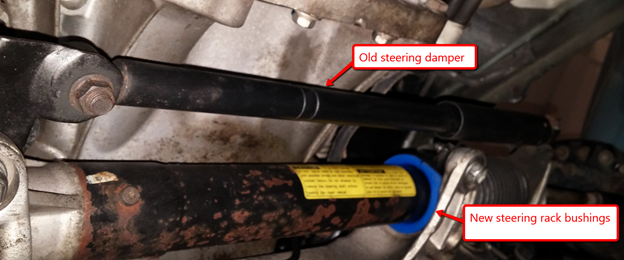
Here is the new steering damper fitted.
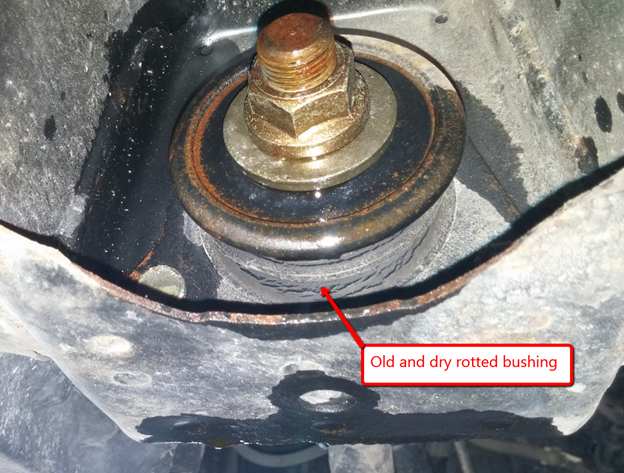
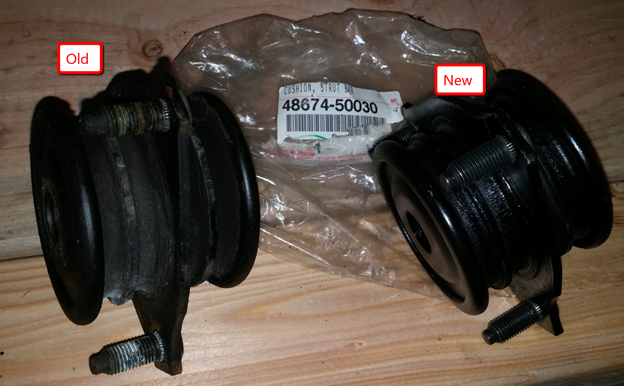
4. Replace the strut bar mount bushings
The original strut mount bushings were dry rotted and possibly leading to brake pulsation as their primary function is to locate the front control arms. Old bushings such as these can allow the control arms to move excessively fore and aft, especially when under load during braking.
Here is a comparison between the new and old bushings. It’s hard to tell the difference when they are not under suspension load.
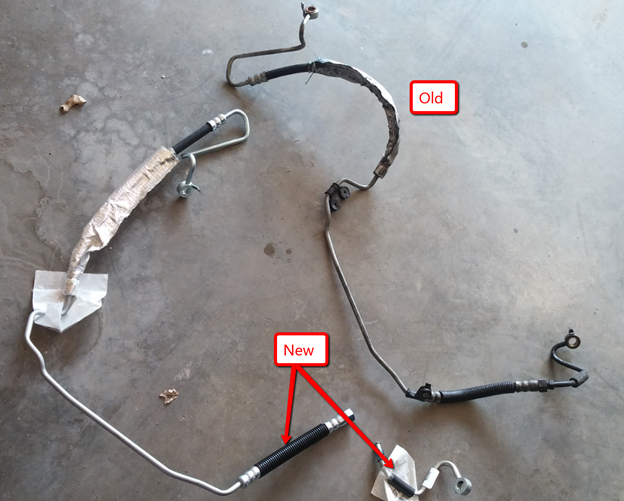
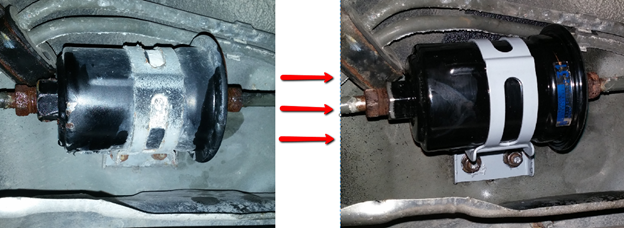
5. Replace the high-pressure power steering line
While I had the steering rack and subframe lowered, it was perfect time to replace the high-pressure power steering line running from the pump to the rack. I was uncertain that this line was leaking – all I knew was that it was drenched in hydraulic fluid that originated from somewhere. I figured it wasn’t worth risking an old part since I was already in there.
6. Replace the fuel filter
This is one of those easy 30 minute jobs. Just unscrew a couple of fittings, drip a little bit of fuel, and slide in the new one. Simple!
What I hadn’t envisioned was frantically squirming around on the garage floor the second I loosened one of the fuel line fittings, which resulted in an endless petroleum shower pouring from above. Gasoline to the eyeball is such a wonderful sensation. Two and a half hours later, the battle was won and the filter was in. Good times!
Fixing the Engine
After having fixed most of my periphery issues, I had gained the confidence I needed to start tackling the jobs in the engine bay that required a bit more “precision.”
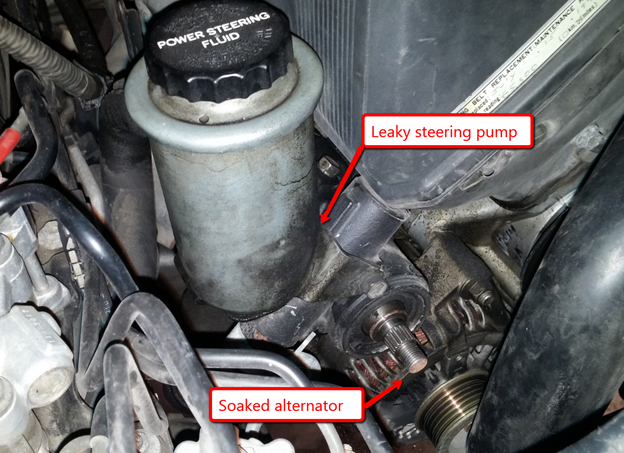
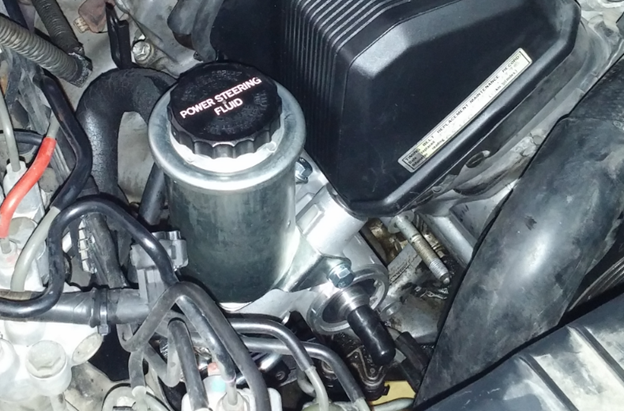
1. Replace the power steering pump
The LS400 is a well-engineered vehicle, but no vehicle is without its dumb designs. The most prominent dumb design on the big Lexus is the power steering pump mounted directly above the alternator. When the pump inevitably begins to leak, the escaped fluid travels the path of least resistance, which happens to be directly into the alternator. Needless to say, the result is a large repair bill because both items eventually need replacement.
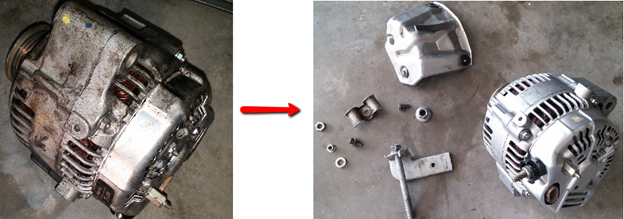
Fortunately I was able to salvage the existing alternator. Following a thorough clean out and inspection it was good as new.
The steering pump, on the other hand, definitely needed replaced. Here’s a quick comparison of the old and new power steering pumps:
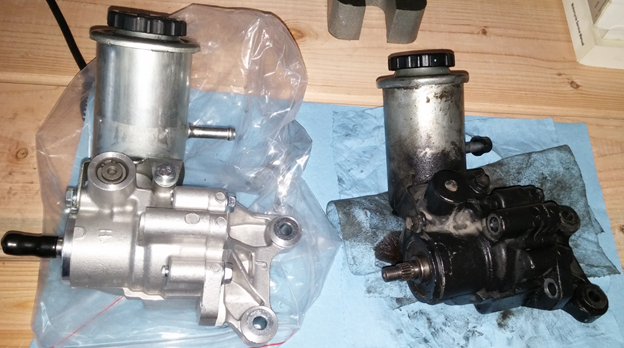
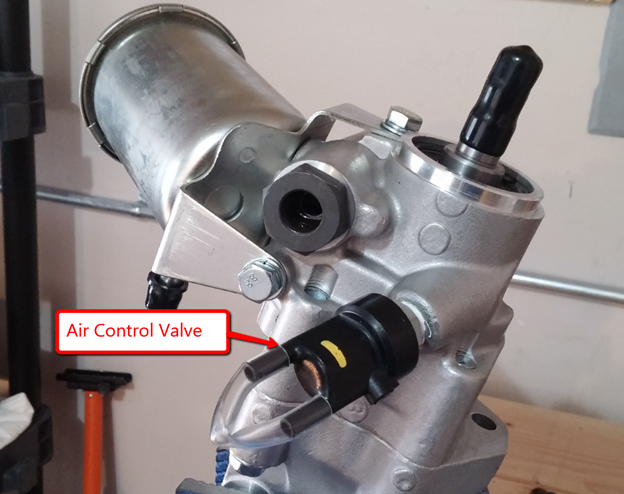
While I had the new pump on the bench, I took this time to install a new air control valve. This vacuum operated valve gives the steering that buttery-smooth and light operation that Lexus is known for. Many owners opt to remove this and plug the hole because the valve can fail over time leading to power steering fluid being sucked into the intake manifold of the engine and being burned off in large plume of white smoke. In my opinion it is definitely worth fitting a new valve to preserve the smooth and effortless steering.
New power steering pump installed:
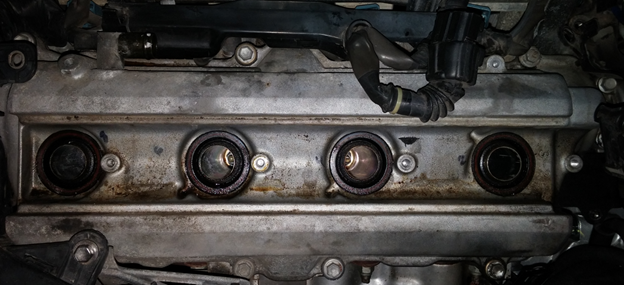
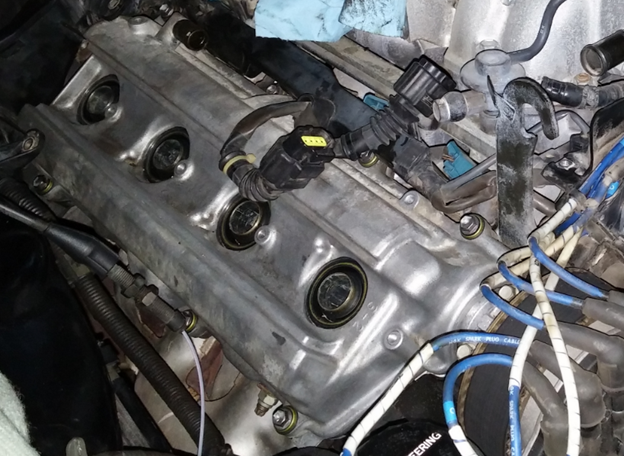
2. Changing the valve cover gaskets
Replacing valve cover gaskets on most vehicles is typically an easy and relatively quick job. I found that the Lexus was a bit more involved than any other car I’ve worked on due to difficult to access bolts, wiring harnesses galore, and general lack of space. They are certainly doable but I would allot yourself at least a whole day to take it on.
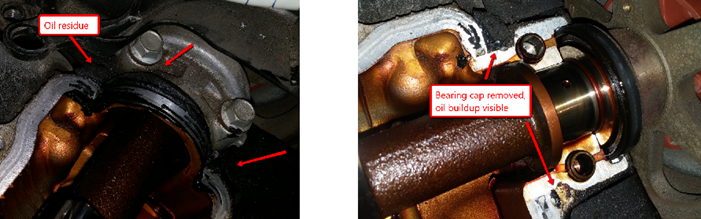
As you can see, there was quite a lot of oil residue developing. I hoped that changing these gaskets would remedy some of the burning oil smell.
When the valve covers are removed you are able to see the camshafts in all of their glory. Someone with a great deal of time on their hands would also take this opportunity to check the valve clearances and adjust them as needed. That is a job in itself and I hadn’t been experiencing symptoms of this needing done, so I left everything as it was.
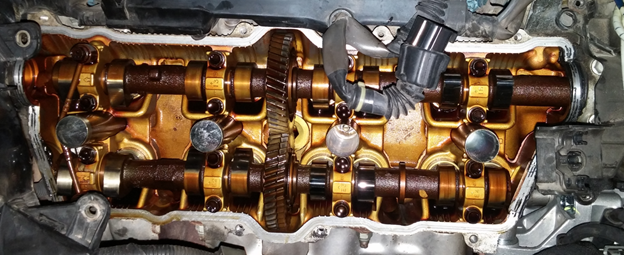
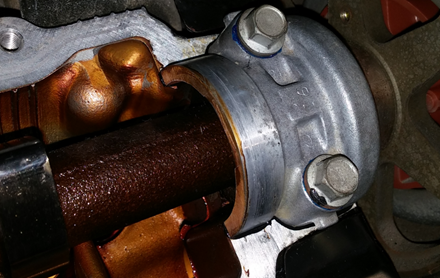
It became apparent that oil leakage was coming from not just the valve cover gasket, but also the camshaft bearing end caps. It would be silly to not reseal these while I was in here. This is one of the reasons this job can take so much time.
Everything cleaned up, resealed and torqued down:
Here you can see the valve covers refitted with new gaskets, spark plug tube seals, and sealing washers on all bolts.
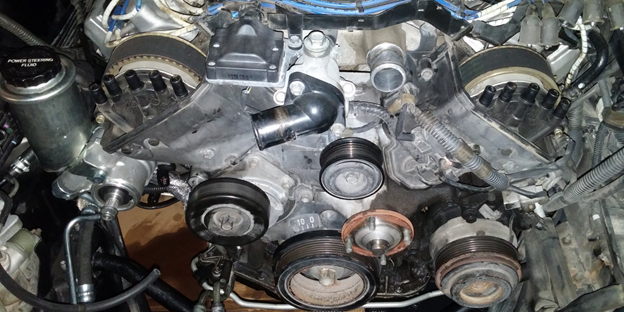
3. Replace water pump, timing belt, tensioner, pulleys, seals…
The next phase required complete strip down of the front of the engine and would necessitate the most concentration. I knew that at least one of the camshaft seals was leaking and it was the major contributor to the oil spots on the driveway. Of course, to get to this seal means you must remove everything in front of it. This was a great opportunity to do a complete 100k mile service that included a new water pump and timing belt.
A long road lies ahead:
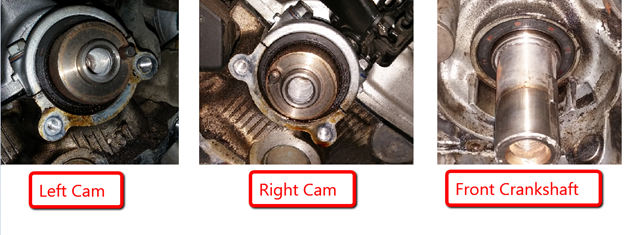
Just when you think you’re almost there, you realize how far away you really are… here you can already see the oil residue originating from the old camshaft seals. It looks like both were actually leaking.
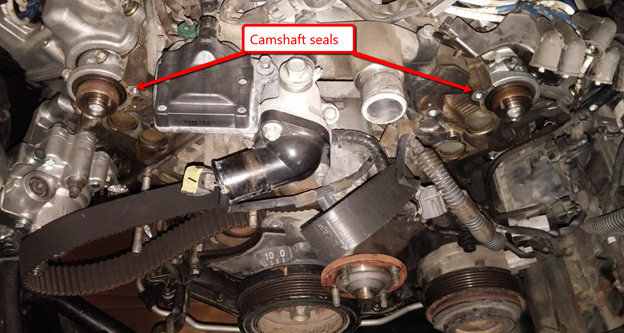
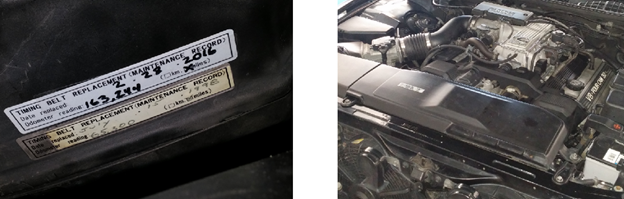
Here are the individual seals on the front side of the engine. I don’t think they had ever been replaced in the car’s 163,000 miles.
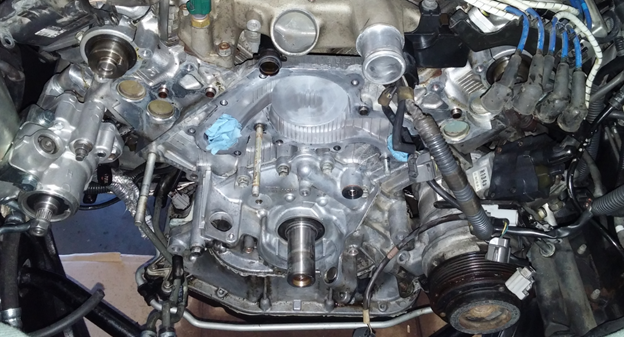
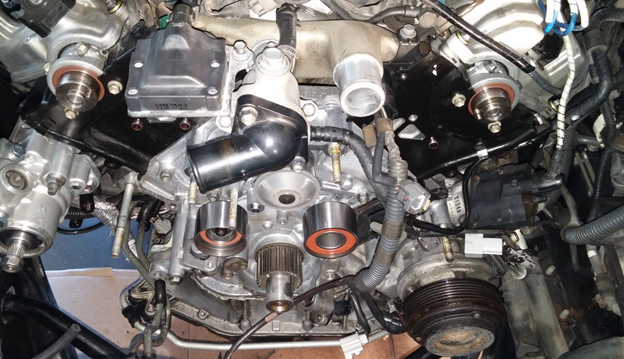
It’s a good idea to clean up all oil residue you find as you go. You don’t want to get any of that junk inside of the engine when you begin to remove the seals and water pump. Pictured below is the final tear down stage. Everything has been removed that needs to be removed, including the water pump. From this point on it is just reassembly.
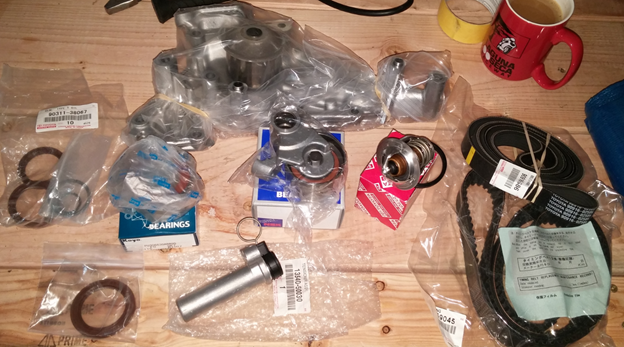
New OEM Lexus parts ready to go in! The price difference between OEM and aftermarket is so small so it was a no-brainer going with the OEM option.
The new seals are in, the new water pump is installed and new tensioner and pulleys are fitted.
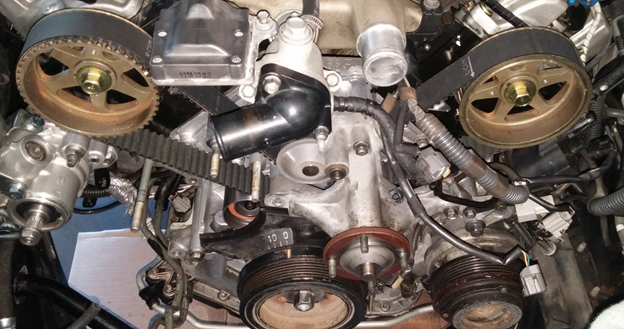
The new timing belt is now in and all timing marks are properly aligned.
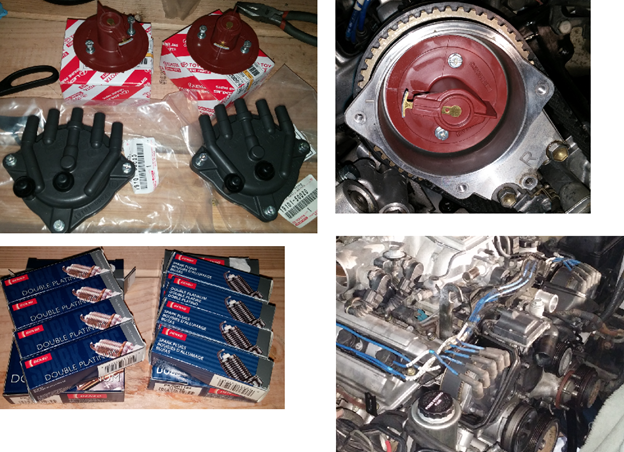
Now is a good time to install new ignition rotors, caps, and spark plugs.
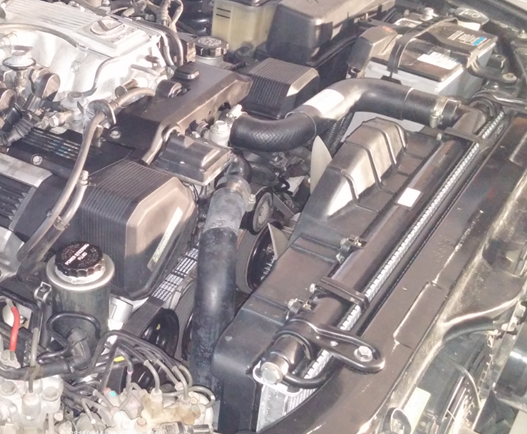
4. Replace the main components of the cooling system.
The original radiator and hoses were still nestled securely in the car. While there was no sign of leakage, it would be foolish to assume they would last another 10 years or 100k miles. Plastic and rubber does have a lifespan even if it is a Toyota. So, with having a new water pump installed, it made sense to put in a new radiator and hoses.
As I began removing the old radiator it became very clear its expiration date was soon approaching.
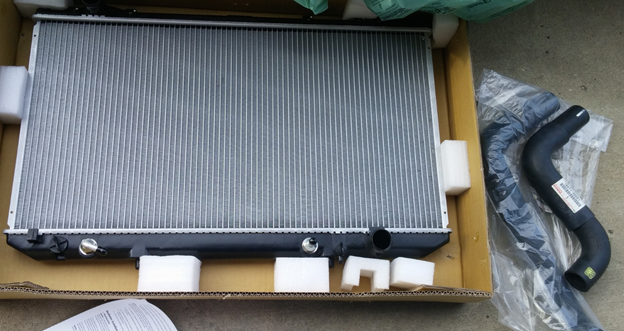
Here is the new radiator and hoses installed.
Everything buttoned up, timing belt sticker applied and all fluid systems bled. The overhaul is complete!
So, was it worth it?
Turning on the ignition after just having had everything completely apart is a nerve wracking experience. You fully anticipate something to go horribly wrong. Not because you know you screwed something up along the way, but instead because you have seen how many individual parts must work together to produce a functioning vehicle. How could such complex machinery work like clockwork every time?
Luckily, the engine started right up and I let out a huge sigh of relief. It was once again the car it should have been all along. Smooth doesn’t even begin to describe the engine. The steering was light and tight and there were no vibrations to be felt anywhere. It’s been three weeks and 600 miles and there is not a hint of a leak or anything else amiss.
I invested a total of 10 days and spent $1622.64 in parts and supplies. Many hours were put into researching how to do certain procedures. I combed over the service manual for detailed specifications and I scoured the interwebs to find the best deal on quality parts and special tools. Prep work is required to take on a job like this and minimize down time. If anything, that was hardest part of the whole operation. If you can do all of the planning upfront it will pay dividends in the end.
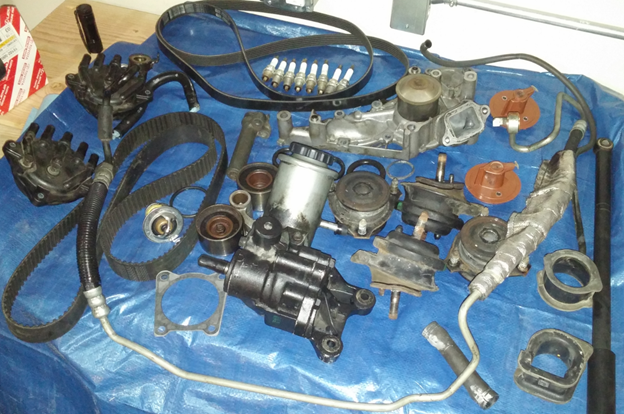
I feel I made the right choice reviving my current vehicle only after I was finished. Looking back, I see that the process was stressful and full of uncertainty. At the time of ordering the parts, I felt that I had made the WRONG decision. It is one thing to have purchased all the parts you need, it is a completely different animal actually installing them successfully. The aftermath of old parts, pictured above, made me all the more thankful to have gone through with the overhaul as many of those parts were on their last legs.
With ambition, a few tools, and moderate mechanical aptitude, any Jalop could undertake such an operation. If you have a special attachment to your vehicle, it may very well be worth holding on to it and giving it the love it deserves. In the end you’ll be happy you did.
will davis
Very good write up. I have also done much of this work on my 94. One question though. I found the same thing AFTER replacing the valve cover gaskets. The timing belt and water pump job allowed me to replace the front seals of camshaft and main and my oil leak stopped, for a while. The end cap of the camshaft is my only leak now and I’m not clear on exactly how you did that procedure. You said resealed but I don’t understand if that meant you replaced a seal at the back side or if there is another method.
Practical Moto
The end caps are sealed with a silicone sealant (Toyota FIPG actually) on the flat machined faces that meet with the cylinder head. The arrows in the picture are roughly where you put a bead of sealant. You can see the black sealant squishing out partially in the picture where the cap is reinstalled. Take a look at this article (https://jalopnik.com/here-s-exactly-what-it-cost-to-buy-and-rebuild-an-old-t-1795160777) where I do the exact same procedure on a different Toyota engine (the picture is under the “Valve Cover Gasket” section).
Larry
I wish more write-ups like this existed with photos and such organized and detailed information and tips. Loved it man, your work is awesome
William G
I have a 96′ ls400. I’ve replaced the Powersteering pump twice and it’s still leaking. The leak is where the reservoir and pump meet so I think it might be a bad oring but the reservoir and pump are brand new. After replacing it twice, I am assuming its a bad high pressure line. Do I need to remove the powersteering pump to remove the high pressure line?